🧰 Web3 [Serie Part 7/10] - Listen to Smart Contract Events
![🧰 Web3 [Serie Part 7/10] - Listen to Smart Contract Events](/content/images/size/w960/2021/09/web3js-tutorial-part0-7.png)
Introduction
What is an Event?
An event emits data from a Smart Contract, when a transaction occurs.
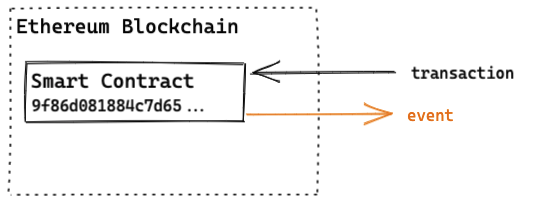
This is useful when you need to monitor certain transactions and update your Web App, for instance.
It’s important to note that events are inheritable, and when generated they are not accessible from within contracts, not even the one which has created and emitted them.
If you need more details, have a look to the Solidity's events doc, here.
In the next sections we will go through 3 methods to read/listen to events.
Method 1 - Trigger Emit Event via a Transaction
In our contracts directory, we create a new file called MyContract3.sol . Here is the Smart Contract we will be using. Comments are following.
pragma solidity >=0.4.16 <0.9.0;

contract MyContract3 {
    event MyPayment (
        uint indexed date,
        address indexed from,
        address indexed to,
        uint amount
    );

    function payment(address to, uint amount) external {
        emit MyPayment(block.timestamp, msg.sender, to, amount);
    }
} In this solidity script, we are defining a function called Payment. This payment function is simulating a token transfer from an address to another, and will emit an Event when the function is called.
Thus, we define an event called MyPayment first. Each 'MyPayment' event will include 4 parameters:
- Date: the date when the event occured (integer in Solidity)
- From: the address which triggered the event
- To: the target address of the payment
- Amount: the amount of payment
What is indexed?
From Solidity Docs we can read:
"You can add the attribute indexed to up to three parameters which adds them to a special data structure known as “topics” instead of the data part of the log. [...] Topics allow you to search for events, for example when filtering a sequence of blocks for certain events."
Now, we can add the MyContract3.sol in our migration file 2_contract_deploy.js.
Here is the updated migration file:
const MyContract = artifacts.require('MyContract');
const MyContract2 = artifacts.require('MyContract2');
const MyContract3 = artifacts.require('MyContract3');

module.exports = function(deployer){
    deployer.deploy(MyContract);
    deployer.deploy(MyContract2);
    deployer.deploy(MyContract3);
}Now, we can run the truffle migrate command to deploy our new MyContract3 to our local Blockchain.
truffle migrate --resetWe can see that our MyContract3.sol has been successfully migrated thanks to the output in terminal:
Deploying 'MyContract3'
   -----------------------
   > transaction hash:    0x1c167be3bb3c551e015101aa09b977b927b3a49befe411eef089252ec0f382e9
   > Blocks: 0            Seconds: 0
   > contract address:    0xded0Ab79D2ECe65a6dC08885608804e9c5e80b75
   > block number:        11
   > block timestamp:     1630570766
   > account:             0x65ca5ECfd87FaaFE35F63244133EFE9EDF2ABF55
   > balance:             98.97514394
   > gas used:            113737 (0x1bc49)
   > gas price:           20 gwei
   > value sent:          0 ETH
> total cost: 0.00227474 ETHNow, we can move on with our JS Script. Let's create a new index, called index3.js. Here is the code to paste in. Comments are following.
const Web3 = require('web3');
const MyContract3 = require('./build/contracts/MyContract3.json');

const init = async() => {
    const web3 = new Web3('http://127.0.0.1:7545');

    const id = await web3.eth.net.getId();
    const contract = new web3.eth.Contract(
        MyContract3.abi,
        MyContract3.networks[id].address
    );

    const accounts = await web3.eth.getAccounts();

    const receipt = await contract.methods.payment(accounts[0], '1000000000000000000').send({
        from: accounts[1],
    })
    console.log(receipt.events);
}

init();First, we import our MyContract3. Then, create our web3, and contract instances.
Next, we get the accounts addresses from Ganache, and finally we call our new 'payment' method. As defined in our MyContract3.sol, we input the 2 required parameters (from and amount), and we send the transaction.
In our Terminal, we can see the following output, since we console.logged our receipt.events.
{
  MyPayment: {
    logIndex: 0,
    transactionIndex: 0,
    transactionHash: '0x3bc0cad631bee6e061f4b36a7a0c358831cde0edf7e05abae7dcc6a8a8ce76a0',
    blockHash: '0x083ece81a048cda77732aac4358e53b7dfffa1a7429fef03b0c4aff4258287d7',
    blockNumber: 13,
    address: '0xded0Ab79D2ECe65a6dC08885608804e9c5e80b75',
    type: 'mined',
    id: 'log_d92bbfed',
    returnValues: Result {
      '0': '1630571019',
      '1': '0x89d48bf3591db71C2EBd7Be9ea86Ce52442E474C',
      '2': '0x65ca5ECfd87FaaFE35F63244133EFE9EDF2ABF55',
      '3': '1000000000000000000',
      date: '1630571019',
      from: '0x89d48bf3591db71C2EBd7Be9ea86Ce52442E474C',
      to: '0x65ca5ECfd87FaaFE35F63244133EFE9EDF2ABF55',
      amount: '1000000000000000000'
    },
    event: 'MyPayment',
    signature: '0x3f149fb6578fdbf59cb6fffd764d2994d89b758e8dcadb7b14a8d37a05b90520',
    raw: {
      data: '0x0000000000000000000000000000000000000000000000000de0b6b3a7640000',
      topics: [Array]
    }
  }
}- We can read the MyPayment event, the name of our event.
- Then a few lines below, we can read the date, the from & to addresses, and finally the amount.
It works! Great!
👎 Limitations
Thus, this option works great, but it has a limit. You need to be the sender of the transaction to read the event. Most of the time, it will not happen this way.
In most cases, we will need to read events triggered by other people.
Let’s move on to the next method.
Method 2 - getPastEvents
This method allows us to read all the events that occurred from a Smart Contract. We will still using our MyContract3.sol for this method. The only changes are made in our index3.js file.
(Before going, further, we will restart our Ganache Local Blockchain. Otherwise we will have noises in the events we will display. Don't forget to perform the migration using truffle).
const Web3 = require('web3');
const MyContract3 = require('./build/contracts/MyContract3.json');

const init = async() => {
    const web3 = new Web3('http://127.0.0.1:7545');

    const id = await web3.eth.net.getId();
    const contract = new web3.eth.Contract(
        MyContract3.abi,
        MyContract3.networks[id].address
    );

    const accounts = await web3.eth.getAccounts();

	//Triggering Event 1
    await contract.methods.payment(accounts[0], '1000000000000000000').send({
        from: accounts[1],
    });

	//Triggering Event 2
    await contract.methods.payment(accounts[1], '1000000000000000000').send({
        from: accounts[2],
    });

    const receipt = await contract.getPastEvents(
        'allEvents',
        {
            fromBlock: 0
        });

    console.log(receipt);
}

init();
In this script, we call twice the payment methods, and thus we emitted twice an event.
At the end, we call the getPastEvents method. As we can see, we ask for 'allEvents', and we want to search from the block 0, i.e. since the beginning. The 'allEvents' could have been replaced by the name of our event, which would have been 'MyPayment' in this case. You can try to replace 'allEvents' by 'MyPayment', and you will see the same output, including 2 additional events.
More info about getPastEvents method in web3 docs here.
[
  {
    logIndex: 0,
    transactionIndex: 0,
    transactionHash: '0xc8e47f0d25dad437ea866c63d65aee634d6b7cb2d3cef832bb337864a26e9767',
    blockHash: '0xd0f7c551453fdffd9cf2555c6cf2fb8a5506ccc6bba08b44841457902a175d3c',
    blockNumber: 15,
    address: '0xaE76c14CF39f32f88985264AC5471745F9150fE2',
    type: 'mined',
    id: 'log_39908cd0',
    returnValues: Result {
      '0': '1630595111',
      '1': '0x3577B769c0bA9a762211E6F6b006730f8399b231',
      '2': '0xbabbE01661c3ac49B3D5B10A890F8DDD5e60eC7f',
      '3': '1000000000000000000',
      date: '1630595111',
      from: '0x3577B769c0bA9a762211E6F6b006730f8399b231',
      to: '0xbabbE01661c3ac49B3D5B10A890F8DDD5e60eC7f',
      amount: '1000000000000000000'
    },
    event: 'MyPayment',
    signature: '0x3f149fb6578fdbf59cb6fffd764d2994d89b758e8dcadb7b14a8d37a05b90520',
    raw: {
      data: '0x0000000000000000000000000000000000000000000000000de0b6b3a7640000',
      topics: [Array]
    }
  },
  {
    logIndex: 0,
    transactionIndex: 0,
    transactionHash: '0x3d719b3ed229daf7b693560b46c3d8754859254d8fce47364416a2e390ffcb92',
    blockHash: '0x5ec007acc00ec909b97f14e0c961cb2c4249f8b270c24bafeaf5addf9277b21b',
    blockNumber: 16,
    address: '0xaE76c14CF39f32f88985264AC5471745F9150fE2',
    type: 'mined',
    id: 'log_f83c791c',
    returnValues: Result {
      '0': '1630595111',
      '1': '0x2804795Cfb92516345EABDE87A58b4341004b667',
      '2': '0x3577B769c0bA9a762211E6F6b006730f8399b231',
      '3': '1000000000000000000',
      date: '1630595111',
      from: '0x2804795Cfb92516345EABDE87A58b4341004b667',
      to: '0x3577B769c0bA9a762211E6F6b006730f8399b231',
      amount: '1000000000000000000'
    },
    event: 'MyPayment',
    signature: '0x3f149fb6578fdbf59cb6fffd764d2994d89b758e8dcadb7b14a8d37a05b90520',
    raw: {
      data: '0x0000000000000000000000000000000000000000000000000de0b6b3a7640000',
      topics: [Array]
    }
  }
]👎 Limitations
- Asking to check events from block 0 on the Mainnet would take some time, since it has to scan all the blocks looking for our events.
- By default, the getPastEvents method is looking in the ‘earliest’ block (cf. doc here). Thus, to retrieve all events, we have to check from the initial block (fromBlock: 0). If we don’t define the block parameter, we will get the events from the earliest block (you can try ;-)).
☝️Alternative
- It’s possible to filter on specific event’s parameters, by adding the filter key to the getPastEvents method.
- In that case, you will also need to indicate the name of the event.
Example including a filter on the 'to' parameter:
const Web3 = require('web3');
const MyContract3 = require('./build/contracts/MyContract3.json');

const init = async() => {
    const web3 = new Web3('http://127.0.0.1:7545');

    const id = await web3.eth.net.getId();
    const contract = new web3.eth.Contract(
        MyContract3.abi,
        MyContract3.networks[id].address
    );

    const accounts = await web3.eth.getAccounts();

	//Triggering Event 1
    await contract.methods.payment(accounts[0], '1000000000000000000').send({
        from: accounts[1],
    });

	//Triggering Event 2
    await contract.methods.payment(accounts[1], '1000000000000000000').send({
        from: accounts[2],
    });

    const receipt = await contract.getPastEvents(
        'MyPayment',
        {
            filter:{
                to: '0x3577B769c0bA9a762211E6F6b006730f8399b231',
            }
        },
        {
            fromBlock: 0
        });

    console.log(receipt);
}

init();
To be able to use specific parameters as filters, we need to add the ‘indexed’ key in our Smart Contract.
The indexed variables must be chosen widely since we are limited to a maximum of 3.
From the Solidity doc:
"You can add the attribute indexed to up to three parameters which adds them to a special data structure known as “topics” instead of the data part of the log".
More info here.
Method 3 - WebSocket to read Real-Time events
What is a WebSocket?
"A WebSocket is a persistent connection between a client and server. WebSockets provide a bidirectional, full-duplex communications channel that operates over HTTP through a single TCP/IP socket connection. At its core, the WebSocket protocol facilitates message passing between a client and server".
I got this nice definition from this great article, which I recommend if you need more information about the subject.
The advantage of using WebSocket is that we can monitor events in real-time. To simulate this, we will use 2 different scripts. The first script will be listening to event in real-time, while the second script will trigger events.
What we will achieve:
Again, we will relaunch Ganache to get a clean blockchain (don't forget to migrate again using Truffle).
truffle migrate --resetScript 1
We create the 'listener.js' script. Comments are following.
const Web3 = require('web3');
const MyContract3 = require('./build/contracts/MyContract3.json');

const init = async() => {
    const web3 = new Web3(
        new Web3.providers.WebsocketProvider(
            'ws://127.0.0.1:7545'
        )
    );

    const id = await web3.eth.net.getId();
    const contract = new web3.eth.Contract(
        MyContract3.abi,
        MyContract3.networks[id].address
    );

    contract.events.MyPayment({fromBlock: 0})
    	.on('data', event => console.log(event));
}

init();Instead of using new Web3( 'Ganache address' ), we know use the WebsocketProvider.
At the end, we launch a 'listener' console.logging events when they occur.
We launch listener.js in a Terminal 1. You should see a script waiting.
Script 2
Our second script 'events.js' will be quite similar as the one used in the 2 previous methods, since it will only trigger twice the same events.
Here is the code. Comments are following.
const Web3 = require('web3');
const MyContract3 = require('./build/contracts/MyContract3.json');

const init = async() => {
    const web3 = new Web3('http://127.0.0.1:7545');

    const id = await web3.eth.net.getId();
    const contract = new web3.eth.Contract(
        MyContract3.abi,
        MyContract3.networks[id].address
    );

    const accounts = await web3.eth.getAccounts();

	//Triggering Event 1
    await contract.methods.payment(accounts[0], '1000000000000000000').send({
        from: accounts[1],
    });

    await sleep(5000);

	//Triggering Event 2
    await contract.methods.payment(accounts[1], '1000000000000000000').send({
        from: accounts[2],
    });
}

init();


function sleep(ms) {
    return new Promise(resolve => setTimeout(resolve, ms));
}The only additional part is the 'sleep' method for 5 sec.
We are launching this script in a second terminal.
Now, we see the results: 1 event occurs live, then 5 sec later, the second one is displayed.
Hurra! It works! We successfully use 3 differents methods to listen to Smart Contract's events ! Congrats!
![🧰 Web3 [Serie Part 6/10] - Send Ether to a Smart Contract](/content/images/size/w750/2021/09/web3js-tutorial-part0-6.png)
![🧰 Web3 [Serie Part 5/10] - Send Transactions to a Smart Contract (sendTransactions API)](/content/images/size/w750/2021/09/web3js-tutorial-part0-5.png)
![🧰 Web3 [Serie Part 4/10] - Call A Smart Contract](/content/images/size/w750/2021/09/web3js-tutorial-part0-4.png)
![🧰 Web3 [Serie Part 3/10] - Create A Contract Instance](/content/images/size/w750/2021/09/web3js-tutorial-part0-3.png)