🧰 Web3 [Serie Part 8/10] - Deploy & Interact with a Smart Contract with Infura
![🧰 Web3 [Serie Part 8/10] - Deploy & Interact with a Smart Contract with Infura](/content/images/size/w960/2021/09/web3js-tutorial-part0-8.png)
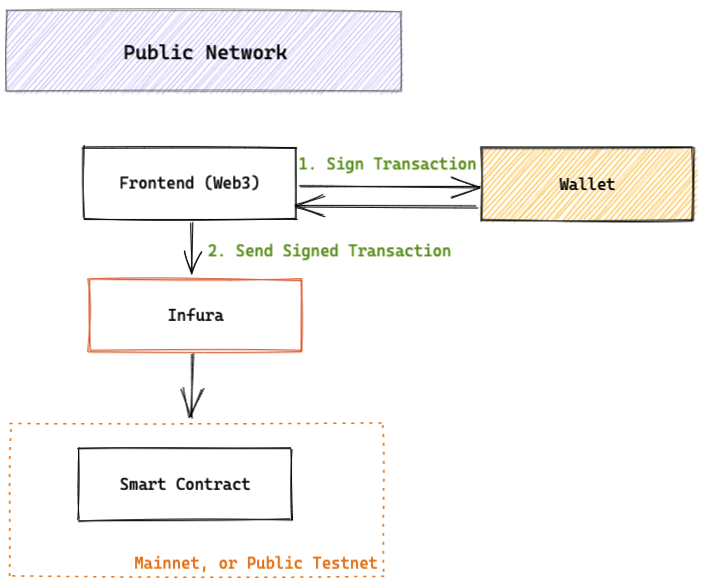
So far, we worked locally, using Ganache. In development mode, we do not sign transactions. This is easier, and not necessary...

In the Mainnet, or other public Testnets (e.g. Ropsten), we need to sign our transactions.
Thus, before sending the transaction, Web3 will request a signature from our wallet, then it will send the transaction to the Blockchain.
To meet this requirement, we need either our own Ethereum node which is not so convenient, or we can use a public API service for Ethereum, called Infura. In this tutorial, we will go for the second alternative.

Our process overview will look like this:
Step 8.1. - Define MyContract.sol
For this part, we will be using the following (very simple) Smart Contract:
pragma solidity >=0.4.16 <0.9.0;

contract MyContract {
    uint data;

    function set(uint x) public {
        data = x;
    }

    function get() public view returns (uint) {
        return data;
    }
}Comments
- The first function 'set' is allocating an unsigned integer 'x' to 'data'
- The second function 'get' returns the unsinged integer 'data'
Now, we need to compile and migrate our Smart Contract (MyContract.sol).
In the migrate directory, create/update a file called 2_contract_deploy.js, and write the following code inside:
const MyContract = artifacts.require('MyContract');

module.exports = function(deployer){
    deployer.deploy(MyContract);
}In the terminal, in our main directory, we can now run
truffle migrate --resetIf everything goes well, you should see the following code in your terminal:
Compiling your contracts...
===========================
> Everything is up to date, there is nothing to compile.
Starting migrations...
======================
> Network name: 'ganache'
> Network id: 5777
> Block gas limit: 6721975 (0x6691b7)
1_initial_migration.js
======================
Replacing 'Migrations'
----------------------
> transaction hash: 0x93da2cd02f10418a58657d8601fa81b6ecf2e3cb73b9d507a208faa5391c41ac
> Blocks: 0 Seconds: 0
> contract address: 0x22e616b5DB5f4996B9BFBd05904420D4fc5C9d17
> block number: 1
> block timestamp: 1629732816
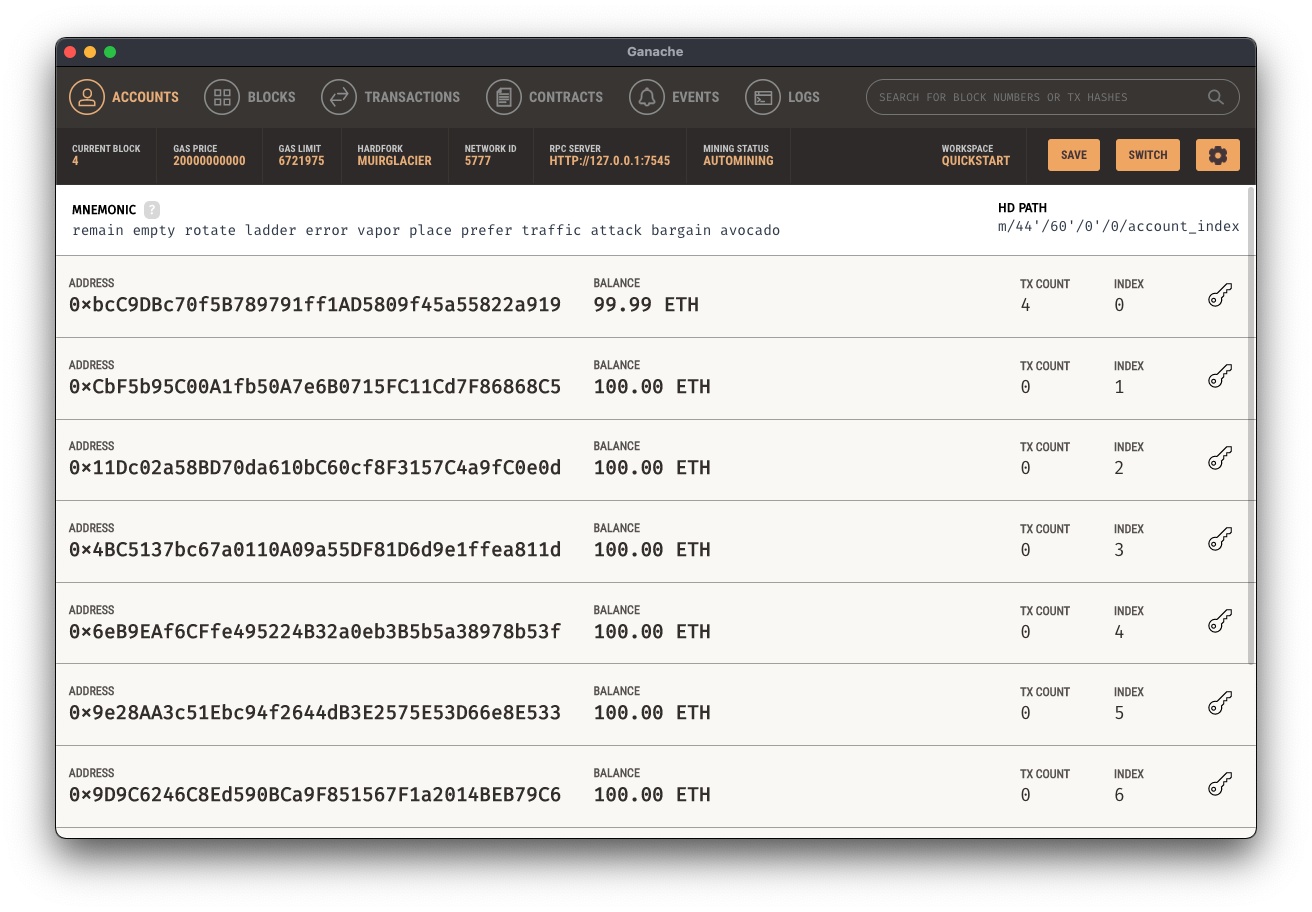
> account: 0xbcC9DBc70f5B789791ff1AD5809f45a55822a919
> balance: 99.99616114
> gas used: 191943 (0x2edc7)
> gas price: 20 gwei
> value sent: 0 ETH
> total cost: 0.00383886 ETH
> Saving migration to chain.
> Saving artifacts
-------------------------------------
> Total cost: 0.00383886 ETH
2_contract_deploy.js
====================
Replacing 'MyContract'
----------------------
> transaction hash: 0xa33021a83dc7cfdae5c88839feb90e10744f20be4259c1705d0b424a95e0e6fa
> Blocks: 0 Seconds: 0
> contract address: 0xFB82a784b658323144AFdAa19F3dc2866b4f0220
> block number: 3
> block timestamp: 1629732817
> account: 0xbcC9DBc70f5B789791ff1AD5809f45a55822a919
> balance: 99.9933906
> gas used: 96189 (0x177bd)
> gas price: 20 gwei
> value sent: 0 ETH
> total cost: 0.00192378 ETH
> Saving migration to chain.
> Saving artifacts
-------------------------------------
> Total cost: 0.00192378 ETH
Summary
=======
> Total deployments: 2
> Final cost: 0.00576264 ETHAnd you will see the balance of our first account in Ganache smaller than 100 ETH.
Step 8.2. - The JS Script
First we need to install the 'HDWalletProvider' JS library. It will help us signing the transactions for addresses derived from a 12 or 24 word mnemonic.
More info here.
npm install @truffle/hdwallet-providerNow we are all set, and we can move on the JS script.
Here is the code, comments are following:
const HDWalletProvider = require('@truffle/hdwallet-provider');
const Web3 = require('web3');
const MyContract = require('./build/contracts/MyContract.json');

const ganache = 'http://127.0.0.1:7545';

const address = '0xbcC9DBc70f5B789791ff1AD5809f45a55822a919';
const privateKey = '6dbcdcbbb19a9c83a026eb3fe1e1257b9df1e54abeb06ca03e6037a1c68fa02b';

const message = 10;

const main = async() => {
    const provider = new HDWalletProvider(
        privateKey,
        ganache
    );

    const web3 = new Web3(provider);

    const id = await web3.eth.net.getId();
    const deployedNetwork = MyContract.networks[id];

    let contract = new web3.eth.Contract(
        MyContract.abi,
        deployedNetwork.address
    );

    try {
        const receipt = await contract.methods.set(message).send({
            from: address,
            gas: 3000000,
        });

        console.log(receipt);

        const x = await contract.methods.get().call({
            from: address,
            gas: 3000000,
        });
        console.log(x);


    } catch (error) {

        console.log(error)

    }
}

main();
Comments
- We import the required libraries: @truffle/hdwallet-provider (library to sign transaction), web3 (library to interact with Smart Contracts), our MyContract (our Smart Contract).
- We store Ganache host address in a constant (easier). In my case, I have http://127.0.0.1:7545 .
- We store the Ethereum account address to a constant address (1st address displayed in Ganache).
- We store the Private Key (available in Ganache by clicking the small key displayed on the right of the selected account).
- We define a 'message', which is the message we will store in the Blockchain. In our case, it will be an integer 10.
- We declare our Custom Provider using the library HDWallerProvider. It requires two parameters: the Private Key, and the Network (in this intermediary step, we use Ganache. Later we will change this to connect with Infura).
- We instantiate Web3 using our custom provider,
- We instantiate our Contract using the web3 library.
- In the try/catch section, we send the transaction to the method 'set' including our message as a parameter. To use the send method, we also need to include 2 parameters 'from' (the source address), and the gas limit. More info here.
- We console log the receipt to check if everything is going well
- Finally, we call the 'get' method to see the message we stored in the Blockchain.
Now, you can run the script. If everything is working well, you should see the following results in your Terminal:
{
  transactionHash: '0x20feeece73fd9199a76d5ee135a9dd7edbbc8219b071839cd3e5f336421fcca3',
  transactionIndex: 0,
  blockHash: '0xe9ecc83d371699001cda552f67b9174c2c74527dd7ade0c30e15082affa74d1c',
  blockNumber: 5,
  from: '0xbcc9dbc70f5b789791ff1ad5809f45a55822a919',
  to: '0xfb82a784b658323144afdaa19f3dc2866b4f0220',
  gasUsed: 41424,
  cumulativeGasUsed: 41424,
  contractAddress: null,
  status: true,
  logsBloom: '0x00000000000000000000000000000000000000000000000000000000000000000000000000000000000000000000000000000000000000000000000000000000000000000000000000000000000000000000000000000000000000000000000000000000000000000000000000000000000000000000000000000000000000000000000000000000000000000000000000000000000000000000000000000000000000000000000000000000000000000000000000000000000000000000000000000000000000000000000000000000000000000000000000000000000000000000000000000000000000000000000000000000000000000000000000000000',
  events: {}
}
10
Yes! It works, but we are still in local, but signing our transaction.
We can move on with Infura, and the Ropsten Public Network.
Step 8.3. - Infura
(BTW, what is Ropsten?)
Ropsten Ethereum, also known as “Ethereum Testnet”, are as the name implies, a testing network that runs the same protocol as Ethereum does and is used to testing purposes before deploying on the main network (Mainnet).
Ethereum has several networks. Your Valuable ETHs are in the Main Net. The rETHs are on the Ropsten one.
Ropsten ETHs are used for testing purposes. When developers are building dApps, or experimenting on the network, to avoid losing money paying real ETH for transaction fees and smart contract deployments, it’s better to use the Ropsten Network.
More info in this very good article.
To deploy our Smart Contract to Ropsten, we need an access to an Ethereum node. Either, you are lucky, and you have your own node, or, like me, you don't, and you need another solution 😃. This solution is called Infura.
The World’s Most Powerful Blockchain Development Suite
Our suite of high availability APIs and Developer Tools provide quick, reliable access to the Ethereum and IPFS networks so you can focus on building and scaling next generation software.
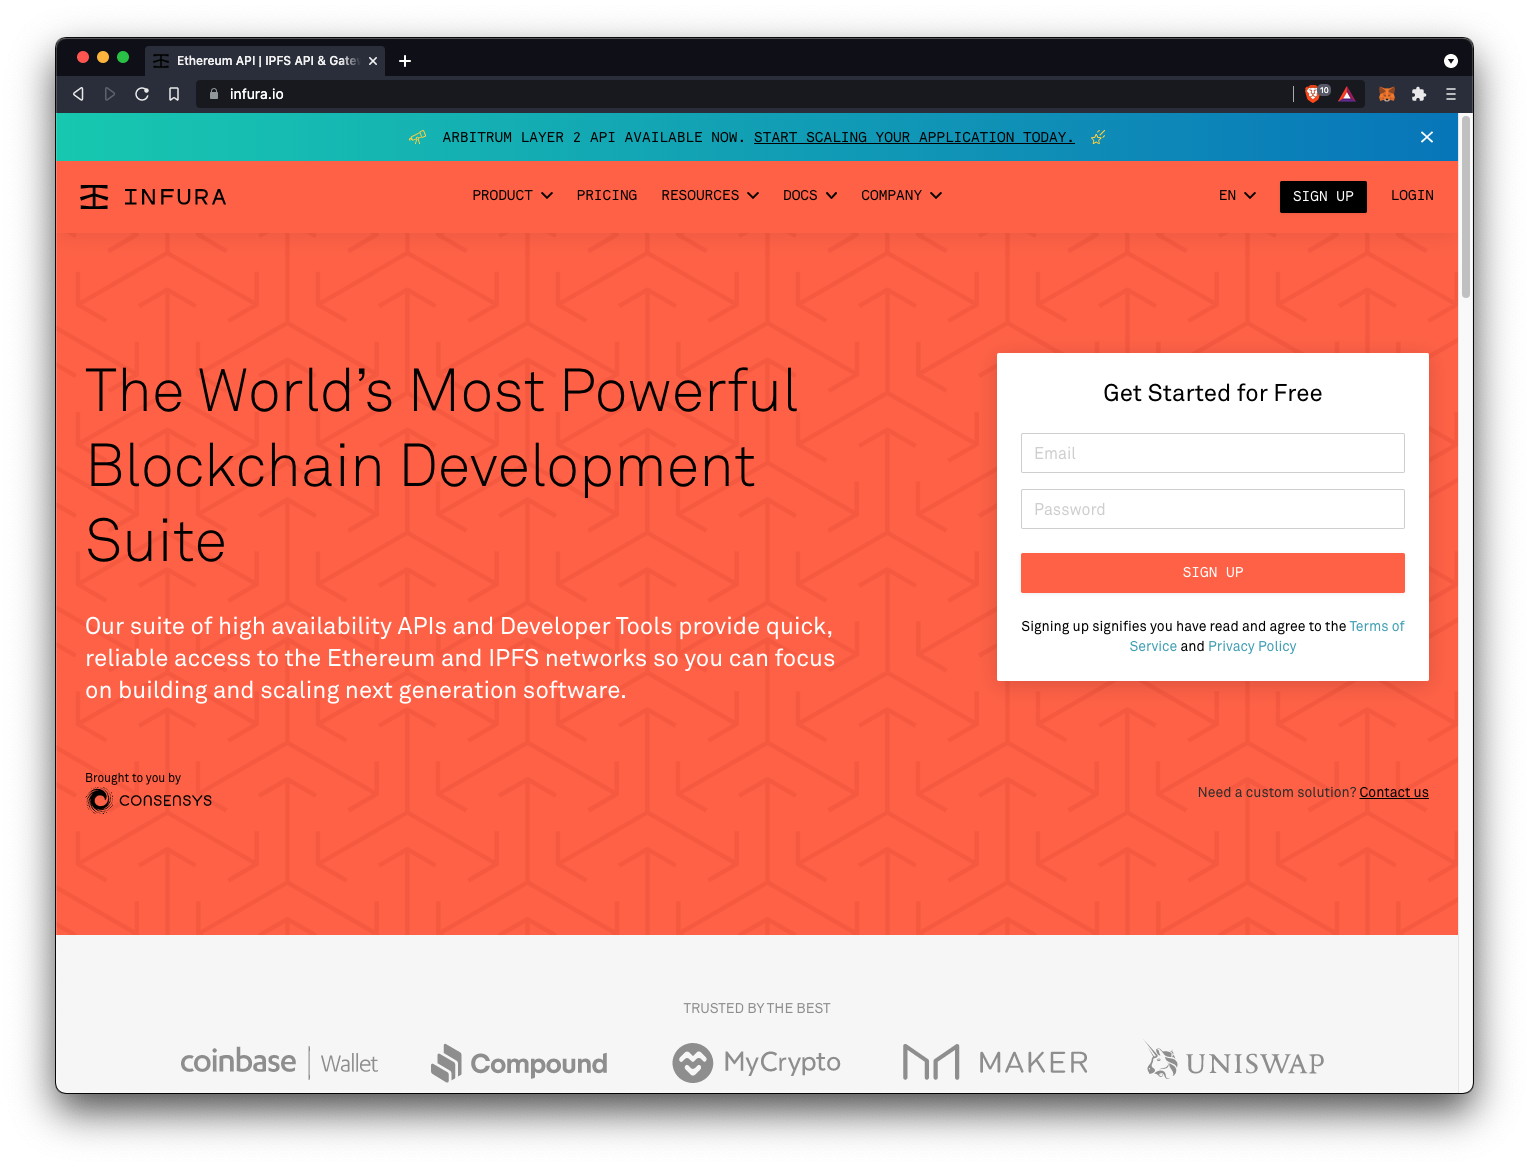
Infura allows us to interact with Ethereum networks (Mainnet & Testnets) by using an API. Hopefully this service is FREE.
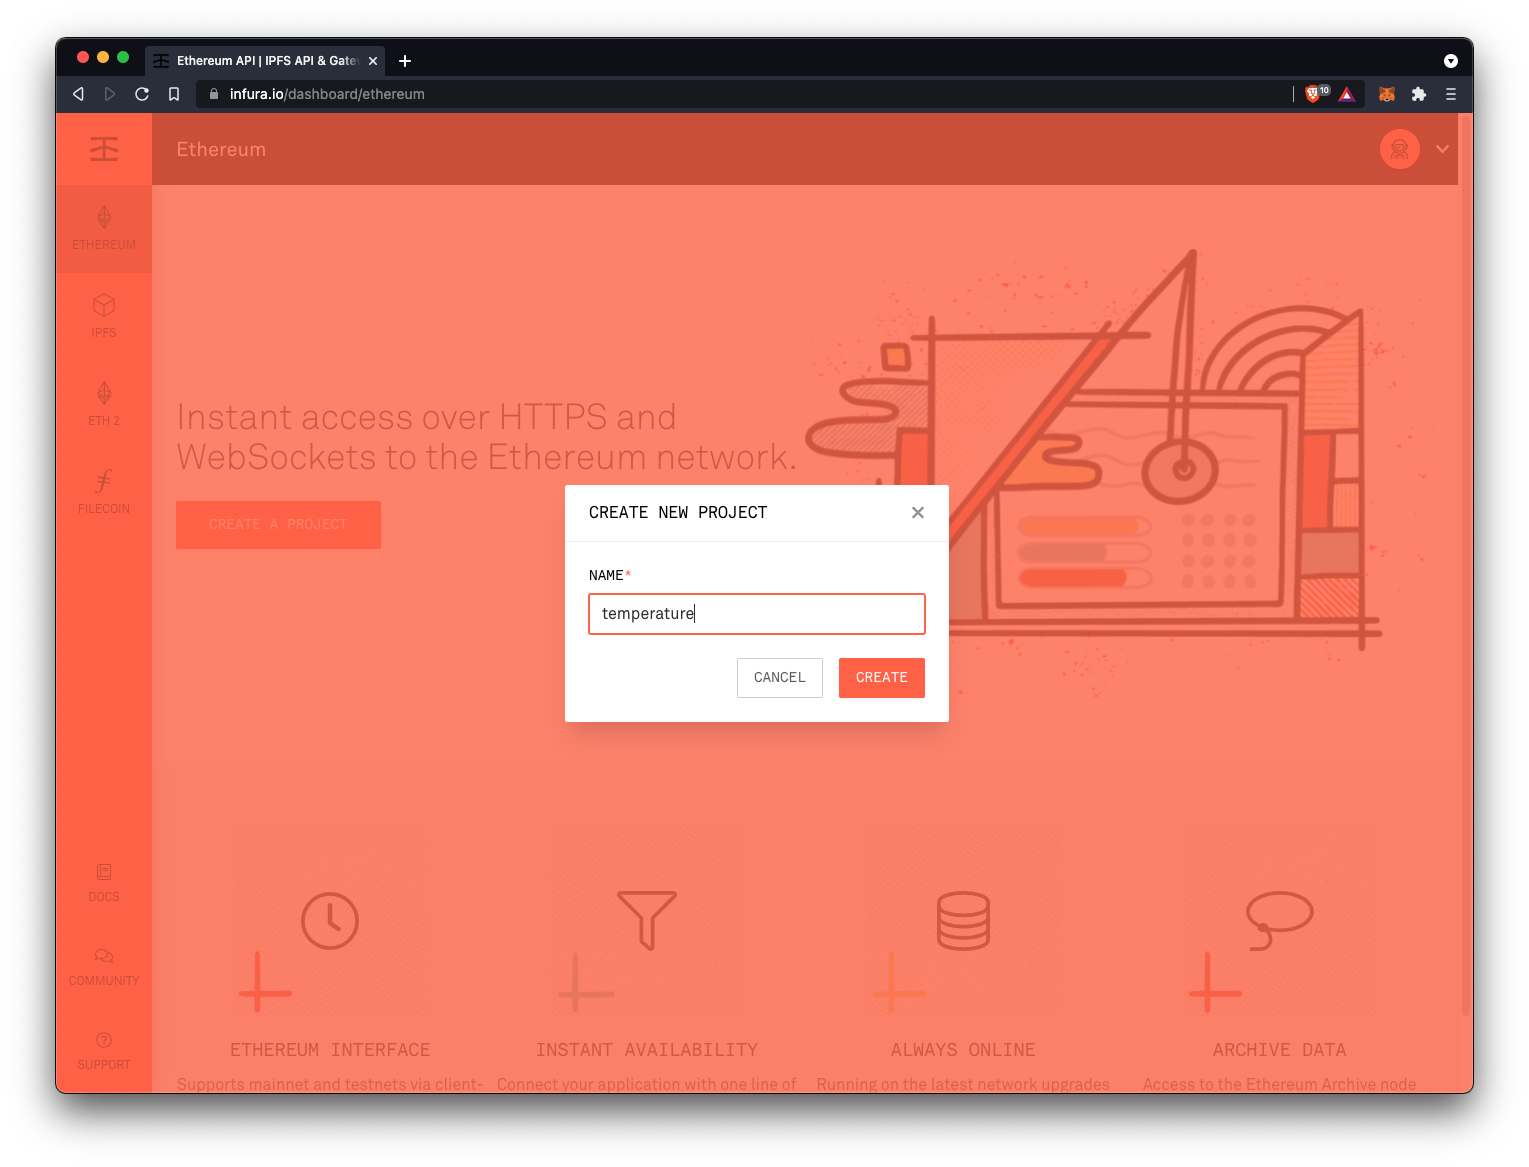
Create your account, and let's move on.
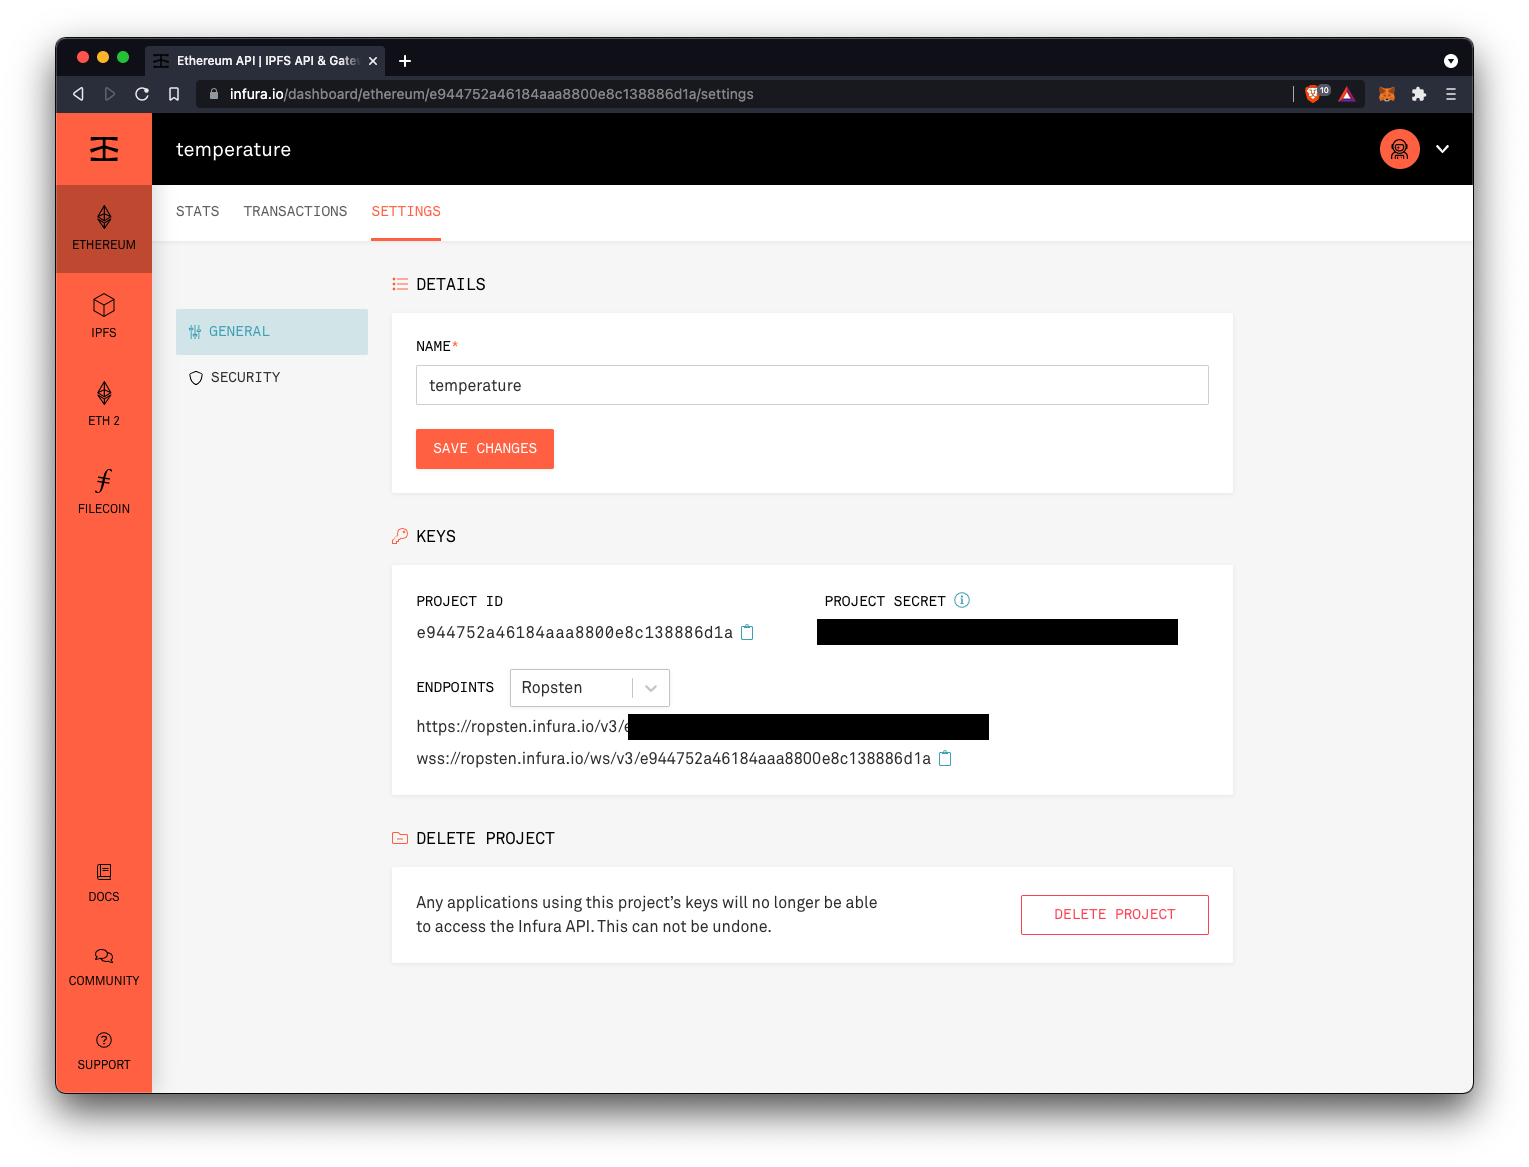
Once signed up, let's create a project.
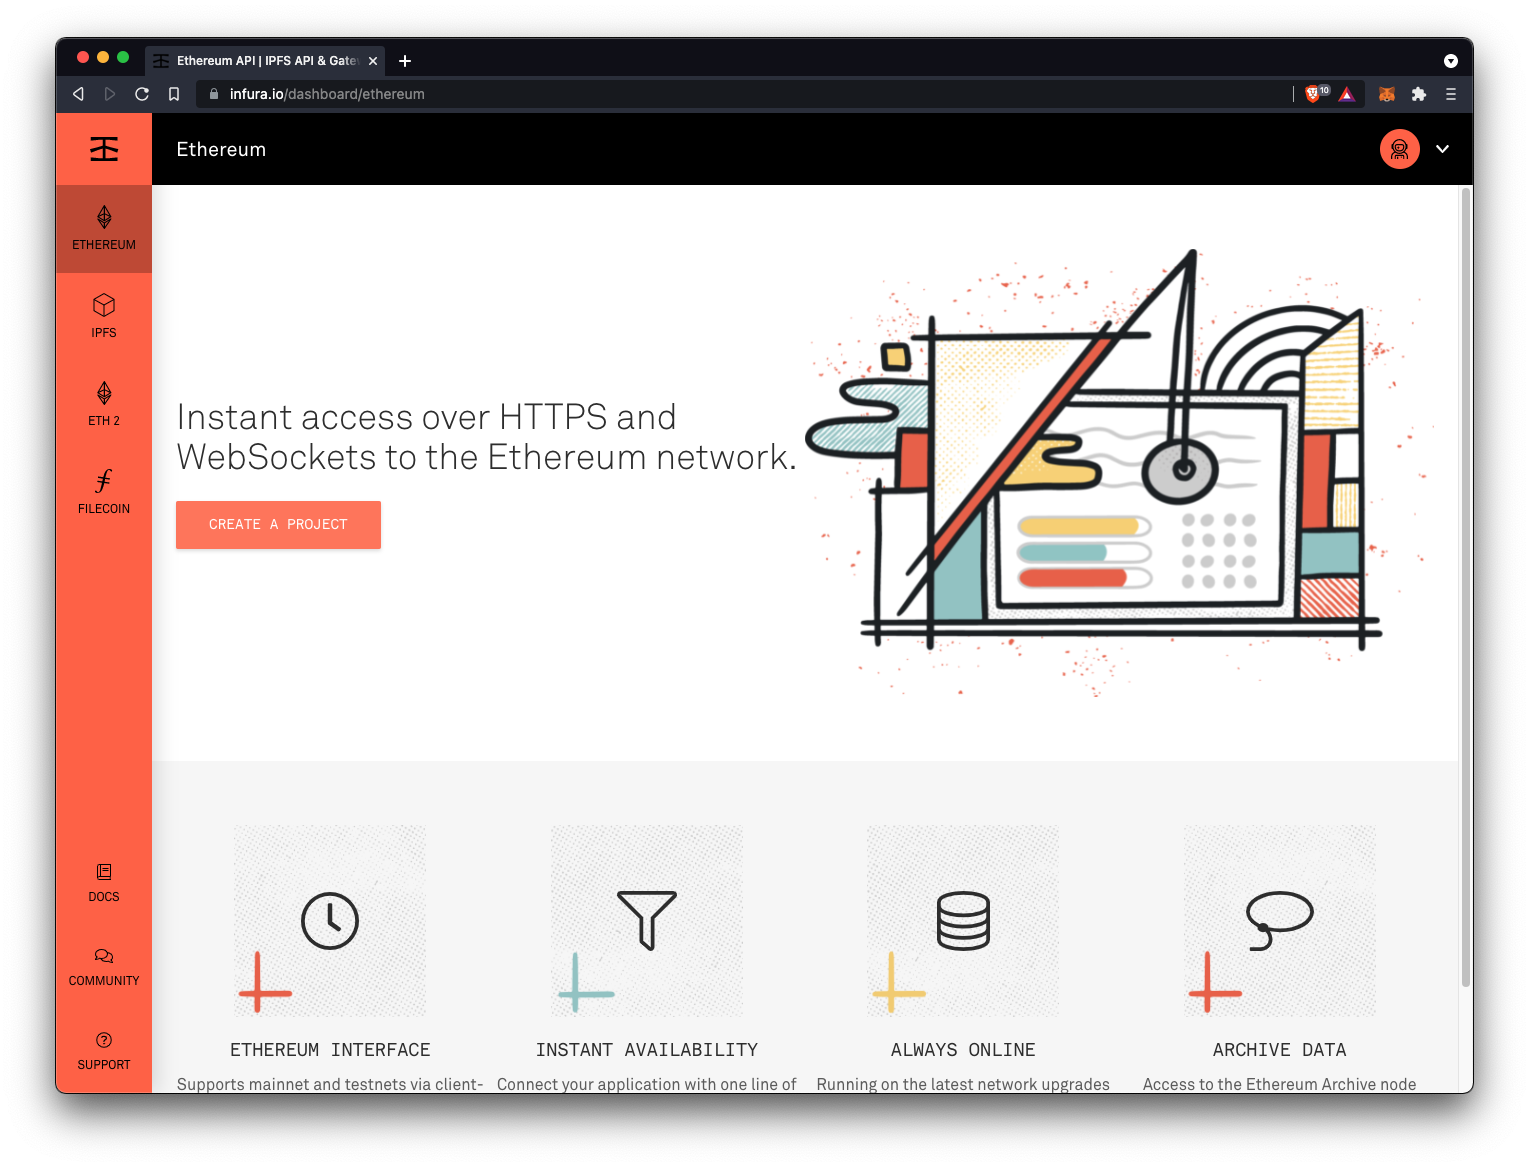
Once created, you can copy the Testnet Ropsten endpoint.
Step 8.4. - Setup Metamask
If it's not the case already, install the Metamask extension to your chrome, by clicking here. Follow the steps.

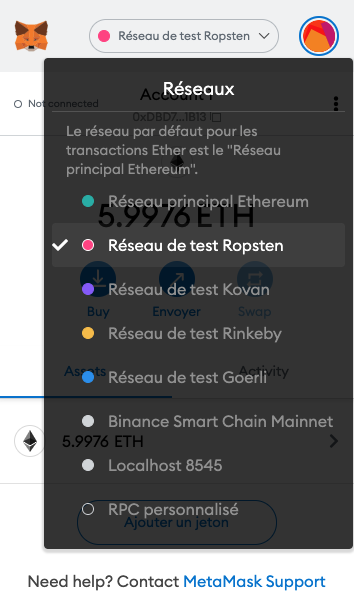
Once installed, and set up, change to the Ropsen network, and click on the top right icon, create a new Account, and call it Test.
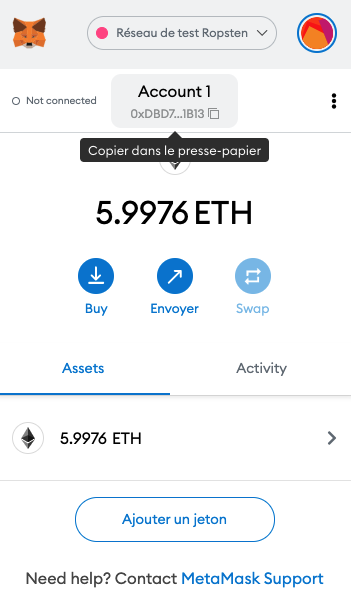
Copy the Account address, right under the Test title. Now, we need to provide 'fake' Ether to this account, in order to 'pay' our deployment within the Testnet Network.
How To Get Faucet?
🚰 Go to https://faucet.ropsten.be/, paste your account address, and click on 'Send me test Ether'. After a couple of seconds/minutes, you will see the test Ether arrives on your Test account in Metamask.
⚠️ Warning⚠️ --> Avoid clicking several times on the Send button, to avoid being blacklisted!
Once you received your 5 ETH, we can move on.
Step 8.5. - Edit our JS Script to deploy on Ropsten using Infura
Here is the code, comments are following:
const HDWalletProvider = require('@truffle/hdwallet-provider');
const Web3 = require('web3');
const MyContract = require('./build/contracts/MyContract.json');

const ropsten = 'https://ropsten.infura.io/v3/YOUR_END_POINT';

const address = 'YOUR METAMASK ROPSTEN ACCOUNT ADDRESS';
const privateKey = 'YOUR METAMASK ROPSTEN ACCOUNT PRIVATE KEY';

const message = 10;

const main = async() => {
    const provider = new HDWalletProvider(
        privateKey,
        ropsten
    );

    const web3 = new Web3(provider);

    let contract = new web3.eth.Contract(
        MyContract.abi,
    );

    contract = await contract
        .deploy({data: MyContract.bytecode})
        .send({from: address});

    try {
        const receipt = await contract.methods.set(message).send({
            from: address,
            gas: 3000000,
        });

        console.log(receipt);

        const x = await contract.methods.get().call({
            from: address,
            gas: 3000000,
        });
        console.log(x);


    } catch (error) {

        console.log(error)

    }
}

main();
Comments
A few stuffs changed compared with our previous version deploying the contract locally. Let's go through the changes:
- We store the Ropsten endpoint to a constant named ropsten (cf. infura)
- We store the address and the private key from the Test account we created in Metamask (⚠️ never share the Private Key to anyone).
- In the provider, we have to define the Ropsten endpoints address, instead of our Ganache network.
- Then, we deploy the contract to the Ropsten network. Locally, we didn't add these deployment lines since we manually deployed our Smart Contract with the 'truffle migrate --reset' command. In this case, we have to deploy the contract to the network.
- The remaining code has not changed.
Now, we went through this code, we can run our script. As you will notice, it will take some time to run the code, since it has to deploy it to the Test Net. It can take up to 1 min to be deployed. At the end, you should see a the following answer in your Terminal:
{
  blockHash: '0xf6582a577bf239233e48b51a42bf49d8eaa4693ca0c2c0d6b7928335e0e53a4f',
  blockNumber: 10894283,
  contractAddress: null,
  cumulativeGasUsed: 401871,
  effectiveGasPrice: '0x12a05f1fd',
  from: '0xdbd78940117b014c4738b850d5e1eb92adfe1b13',
  gasUsed: 43524,
  logsBloom: '0x00000000000000000000000000000000000000000000000000000000000000000000000000000000000000000000000000000000000000000000000000000000000000000000000000000000000000000000000000000000000000000000000000000000000000000000000000000000000000000000000000000000000000000000000000000000000000000000000000000000000000000000000000000000000000000000000000000000000000000000000000000000000000000000000000000000000000000000000000000000000000000000000000000000000000000000000000000000000000000000000000000000000000000000000000000000',
  status: true,
  to: '0xd00f7941510b2d9f432a1568ccf7ca812588aeaa',
  transactionHash: '0xf1dc6bbd5899ae79e84fb4ea55ac3fed083ebcc8c0e6223ece1ce61f0a373e41',
  transactionIndex: 2,
  type: '0x0',
  events: {}
}
10Yes! It worked! Congrats, we successfully deployed our Smart Contract to the Ropsten Test Net. If you wanted to deploy that contract to the Main Net, it's exactly the same, but with a real account, and real Ether.
Wait, let's check to the Ropsten Etherscan to see if we find our Smart Contract, and the value we store inside.
Copy the 'to' value we got in the terminal result. In our case here, it is '0xd00f7941510b2d9f432a1568ccf7ca812588aeaa' . Actually, this is our Smart Contract address. Now, let's go to Ropsten Etherscan, here, and paste the address we just copied.
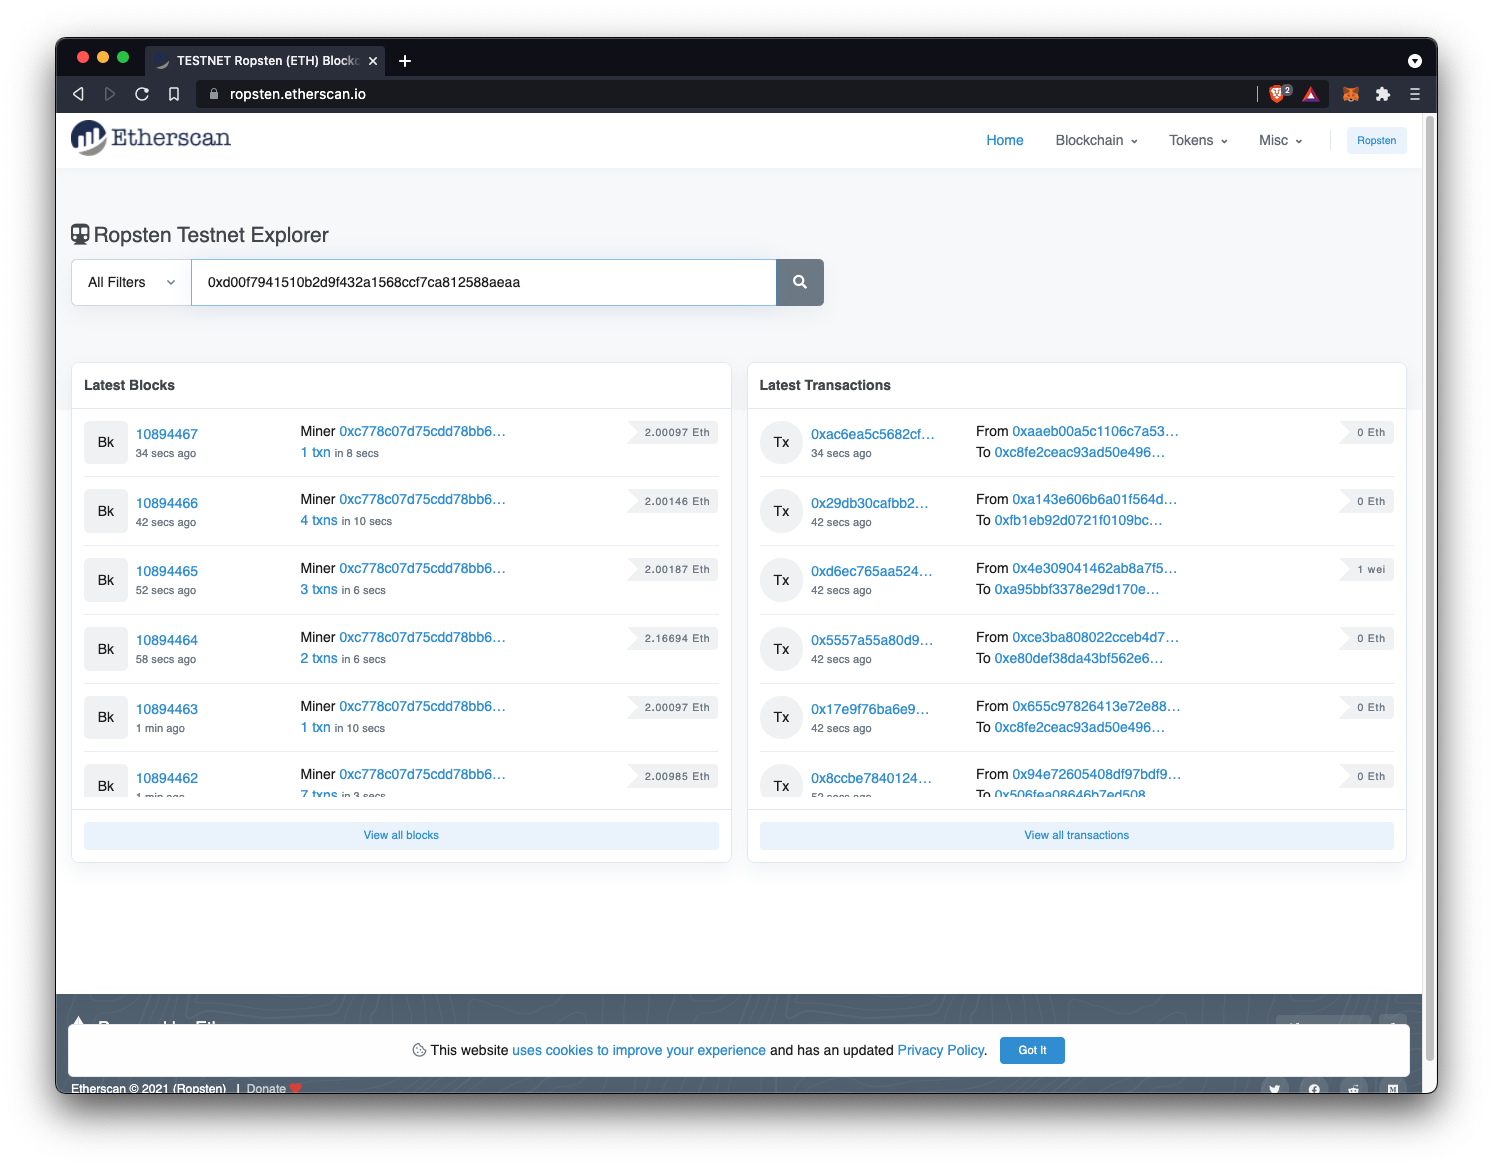
You should see a similar result than below
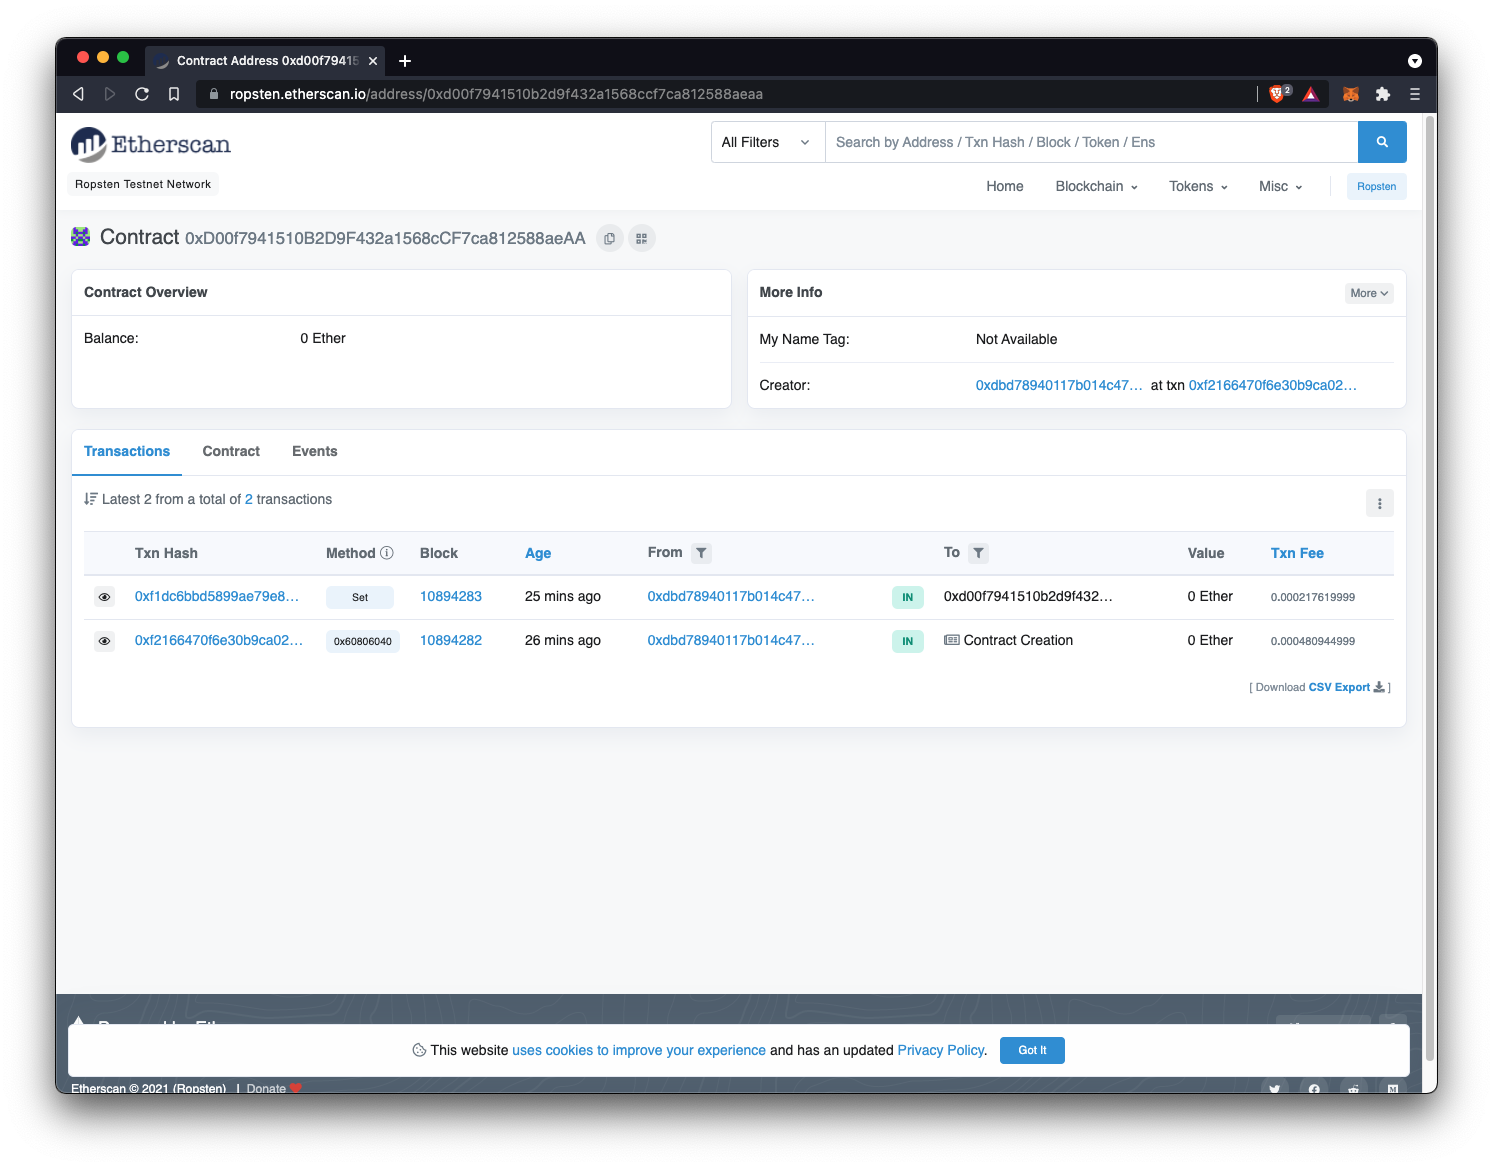
As you can see, there are 2 results.
The bottom result corresponds to our Smart Contract Creation. The other one is our transaction, i.e. setting the value to 10.
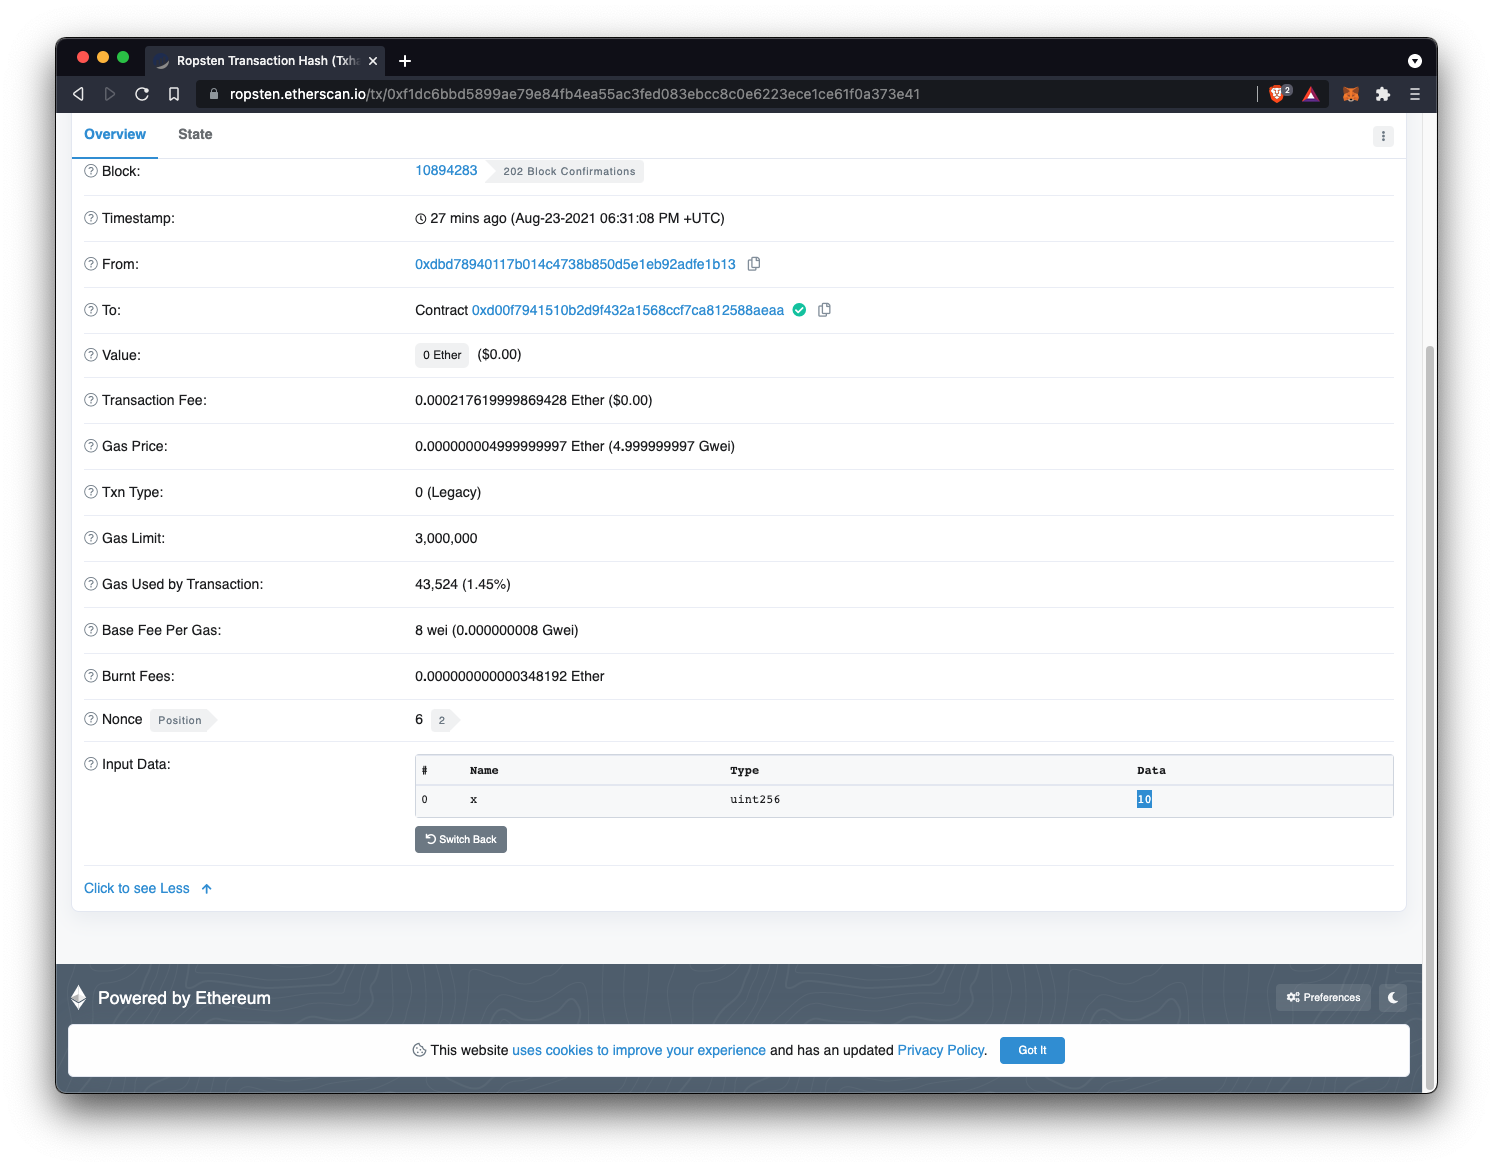
Now, if you click on the Txn Hash of the first transaction in the table, then click to see More, and finally on Decode Input Data, you should see the value we store in our Smart Contract, which is 10.
Bravo! Let's move on to the next session.

![🧰 Web3 [Serie Part 7/10] - Listen to Smart Contract Events](/content/images/size/w750/2021/09/web3js-tutorial-part0-7.png)
![🧰 Web3 [Serie Part 6/10] - Send Ether to a Smart Contract](/content/images/size/w750/2021/09/web3js-tutorial-part0-6.png)
![🧰 Web3 [Serie Part 5/10] - Send Transactions to a Smart Contract (sendTransactions API)](/content/images/size/w750/2021/09/web3js-tutorial-part0-5.png)
![🧰 Web3 [Serie Part 4/10] - Call A Smart Contract](/content/images/size/w750/2021/09/web3js-tutorial-part0-4.png)